
Adjusting shutter louvers for light and privacy

TL;DR:
- Adjusting shutter louvers involves fine-tuning tension and tilt to control light and privacy effectively.
- Using proper tools and following an iterative process ensures precise adjustments without damaging the shutters.
Adjusting shutter louvers is the process of fine-tuning the angle and tension of individual slats within a plantation shutter panel to control how much light enters a room and how much privacy you maintain. Most homeowners refer to this as “adjusting louvers,” though the correct industry term is louver tension and tilt adjustment. Done properly, it transforms a stiff or floppy shutter into one that holds its position precisely, whether you want full blackout at midnight or a soft, diffused glow on a bright afternoon. The two key mechanisms involved are the tension screw and the tilt rod, and understanding both is the foundation of every successful shutter louver adjustment.
What tools do you need before adjusting shutter louvers?
Getting the right tools together before you start saves time and protects your shutters from accidental damage. Plantation shutters, whether from Shutterworld’s Seattle MDF range or the premium Montana hardwood collection, are precision-made products. Forcing a louver with the wrong tool can crack the slat or strip the tension screw housing.
Here is what you will need:
- Phillips-head screwdriver (the most important tool for tension screw adjustments)
- Small flat-head screwdriver for prying off any decorative cover plates
- Soft cloth or microfibre towel to clean louvers before adjusting, preventing grit from scratching the surface
- Replacement screws or washers in case originals are worn or stripped
- Small wrench or needle-nose pliers for stubborn screws that have seized with age
Before touching a single screw, read any manufacturer instructions that came with your shutters. Different shutter ranges use slightly different tension mechanisms. Shutterworld’s bespoke shutters, for example, are made to precise measurements, so the tension calibration at installation is already set to your window’s specific conditions.
Clean the louvers with a damp soft cloth before you begin. Grime and dust build up in the pivot points and can give a false impression of stiffness, leading you to over-tighten when no adjustment is actually needed.
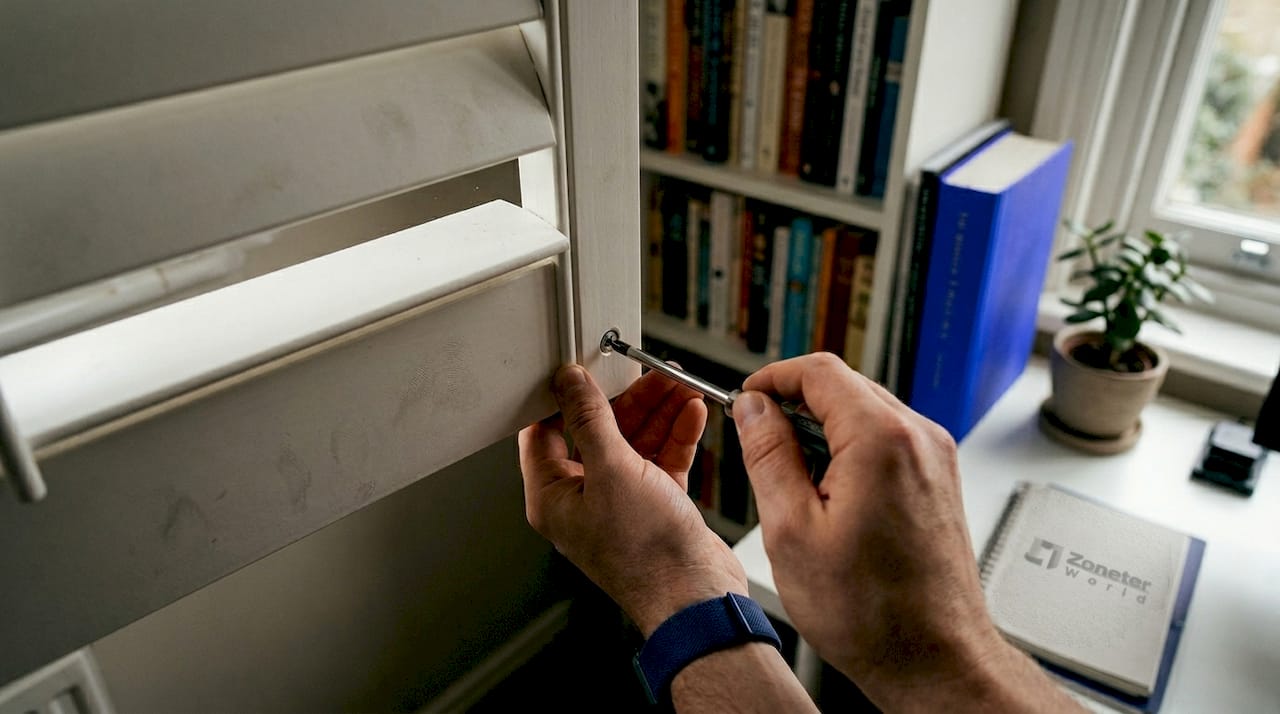
Pro Tip: Close the shutter panel fully before starting any tension adjustment. This gives you a clear view of how the louvers sit and makes it easier to spot which ones are misaligned or loose.
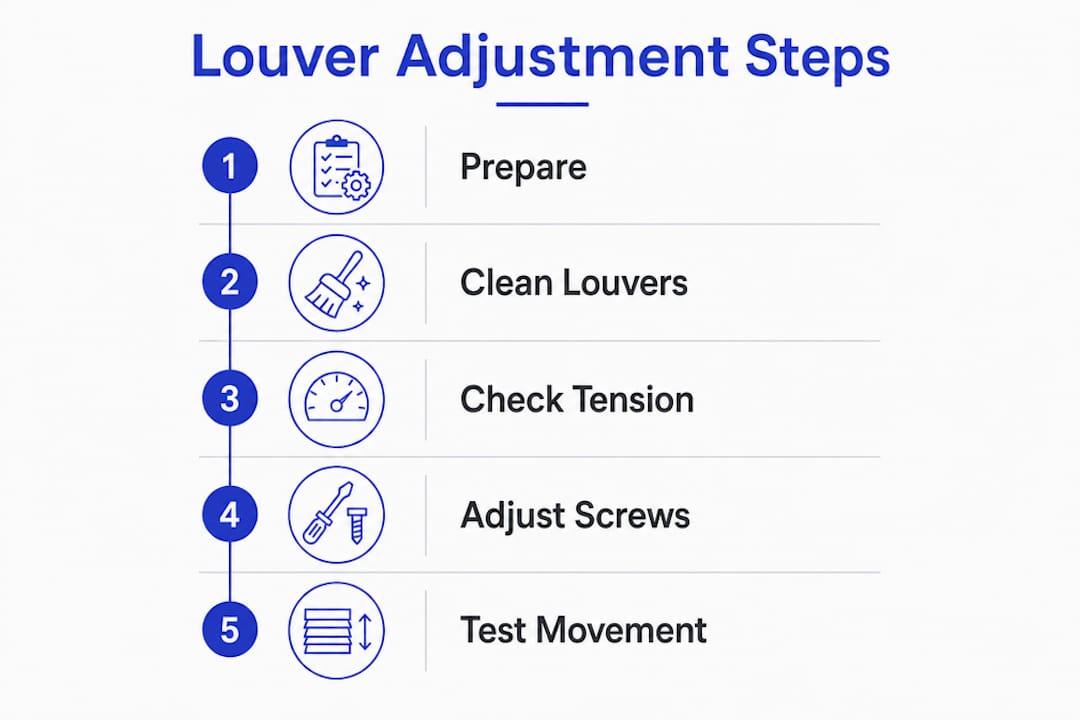
How do you adjust louver tension for smooth, controlled movement?
Louver tension is controlled by small screws located along the sides of each shutter panel, typically at the point where each louver’s pivot pin meets the stile. Locating these tension screws is the first step, and on most modern plantation shutters they sit in a vertical row on the inner edge of the frame.
Follow these steps for a clean, controlled adjustment:
- Identify the loose or stiff louver. Move each louver by hand to find which ones fall open on their own (too loose) or resist movement entirely (too tight).
- Turn the tension screw clockwise by a quarter turn. Use your Phillips-head screwdriver and apply gentle, steady pressure. A quarter turn is the maximum increment per test.
- Test the louver immediately. Move it through its full range of motion. It should hold its position without snapping back or falling open.
- Repeat in small increments until the louver holds firm but still moves with light finger pressure.
- Work from top to bottom across the panel so you maintain consistent tension throughout.
| Symptom | Likely cause | Adjustment needed |
|---|---|---|
| Louver falls open on its own | Tension screw too loose | Clockwise quarter turns |
| Louver will not move at all | Tension screw over-tightened | Counter-clockwise quarter turns |
| Louver rattles in wind | Pivot pin worn or loose | Tighten screw and check pin |
| Uneven resistance across panel | Screws adjusted inconsistently | Re-calibrate all screws to match |
Climate plays a larger role than most homeowners expect. Dry conditions cause wood shrinkage, which loosens joints and makes louvers feel floppy even on shutters that were perfectly calibrated at installation. If you live somewhere with pronounced seasonal dryness, check your tension screws at the start of autumn and again in spring.
Pro Tip: If you feel sudden resistance while tightening, stop immediately. Forcing past resistance risks cracking the wood or stripping the screw housing, particularly on older or hardwood shutters. Back off a quarter turn and reassess.
What are the best louvre angles for light control and privacy?
The angle at which your louvres sit determines everything: how much light enters, how much of the room is visible from outside, and how well air circulates. Getting this right is not guesswork. Historic operable shutters used a closed angle of approximately 10 degrees downward and an open angle of around 60 degrees tilted toward the interior, and those proportions remain the practical standard today.
Here is how different angles serve different needs:
- Fully closed, angled downward away from the house: Directs any water runoff away from the window frame, maximises privacy, and blocks direct sunlight. This is the correct closed position for exterior shutters and is equally effective for interior plantation shutters in ground-floor rooms facing the street.
- Angled downward toward the interior at 45 degrees: Allows diffused natural light to enter while preventing direct sightlines from outside. This is the most popular daytime setting for living rooms and kitchens.
- Angled upward toward the ceiling at 45 degrees: Bounces light up and across the ceiling, creating a bright room without glare on screens or furniture. Particularly useful in home offices.
- Fully open at 60 to 90 degrees: Maximises airflow and light. Use this setting when natural ventilation is the priority, such as on warm evenings when you want a breeze without opening the window fully.
The tilt rod, a vertical bar running down the centre or side of the panel, controls all louvres simultaneously. Introduced around 1830 to 1840, the tilt rod transformed shutters from fixed architectural features into genuinely functional light management tools. On shutters without a tilt rod, each louvre must be adjusted individually by hand, which is more time-consuming but allows for more nuanced, graduated light effects across a single panel.
“When closed, louvers should angle downward and away from the house. When open, they angle downward toward the house to allow air and light in.” — OldHouseGuy Blog
For bay windows, where light enters from multiple angles simultaneously, consider setting each panel at a slightly different tilt to manage glare across the full width of the bay. Shutterworld’s bay window shutter solutions are designed with exactly this kind of nuanced light management in mind.
How do you maintain shutter louvers after adjustment?
Shutter louver maintenance is straightforward, but it requires consistency. Regular inspection and tightening of tension screws extends the operational life of your shutters and preserves their appearance far better than occasional emergency repairs.
Build these habits into your routine:
- Dust louvres weekly with a microfibre cloth or a purpose-made shutter duster. Grime in the pivot points accelerates wear and can cause louvres to seize.
- Check tension screws every six months, ideally at the change of seasons. Thermal expansion and contraction affect wood and MDF differently, so what felt perfect in summer may need a small tweak by December.
- Inspect for misalignment after any impact. A door slamming nearby or a child pulling on a louvre can knock a panel out of true. Realign by gently pressing the panel back into its frame and re-checking the tension.
- Replace worn washers or pivot pins promptly. These small components are inexpensive, and delaying replacement causes the surrounding wood to wear unevenly, making future repairs more complex.
- Handle louvres by the tilt rod, not by individual slats. Gripping a single louvre and pulling puts uneven stress on one pivot point. Using the tilt rod distributes force evenly across all louvres simultaneously.
For older shutters or custom-shaped panels, such as those fitted to arched or triangular windows, consult Shutterworld’s repair tips for unique window shapes before attempting any adjustment. Non-standard frames can have tension mechanisms in unexpected locations, and the standard approach may not apply.
Pro Tip: Apply a tiny amount of clear furniture wax to the pivot pins once a year. It reduces friction without attracting dust, keeping louvres moving smoothly without the need for frequent tension adjustments.
Key takeaways
Proper louvre tension and tilt adjustment, done incrementally with the right tools, is the single most effective way to restore and maintain full light and privacy control from your plantation shutters.
| Point | Details |
|---|---|
| Use the right tool | A Phillips-head screwdriver and quarter-turn increments prevent damage to tension screws. |
| Adjust the tension before the angle | Fix loose or stiff louvres first, then set your preferred tilt for light and privacy. |
| Angle matters more than most realise | A 10-degree downward closed angle blocks sightlines; 45 degrees inward diffuses light beautifully. |
| Climate affects tension | Check screws seasonally, especially in dry conditions that cause wood to contract and loosen joints. |
| Maintenance prevents major repairs | Six-monthly checks and weekly dusting extend shutter life and avoid costly component replacement. |
What I have learned from years of shutter adjustments
Ken here. After working with shutters across hundreds of homes, the single most common mistake I see is impatience. A homeowner notices a floppy louvre, grabs a screwdriver, and tightens the tension screw five full turns in one go. Within a week, the wood has cracked, or the screw housing has stripped, and what was a two-minute fix becomes a panel replacement.
The truth is that effective shutter tuning is an iterative process. One quarter turn, one test. That rhythm feels slow, but it is the only approach that consistently works without causing damage. I have seen it on brand-new MDF shutters and on century-old hardwood panels alike.
I would also push back on the idea that the louvre angle is purely a matter of taste. The downward-away closed position is not just traditional. It is functionally superior for privacy and weather protection, and it is the position your shutters were designed to hold. When homeowners set their louvres flat or angled upward when closed, they are working against the shutter’s geometry.
Finally, do not neglect older or custom shutters. Bespoke panels fitted to arched or bay windows often have tension screws in non-standard locations, and the shutter louvre types guide from Shutterworld is genuinely useful for identifying what you are working with before you start.
— Ken
Discover Shutterworld’s bespoke plantation shutters
If your shutters need more than a tension tweak, or if you are considering an upgrade to shutters that are built to hold their adjustment beautifully for years, Shutterworld is here to help. With over 25 years of experience fitting plantation shutters across the UK, the team at Shutterworld designs and installs made-to-measure shutters that arrive perfectly calibrated for your windows. From the durable Seattle MDF range to the premium Montana hardwood collection, every shutter is crafted for lasting performance. Explore bespoke interior shutter options or book a free in-home survey to see what is possible in your home.
FAQ
What is the easiest way to fix floppy shutter louvers?
Tightening the tension screws along the sides of the shutter panel is the quickest fix for floppy louvers. Use a Phillips-head screwdriver and turn clockwise in small increments, testing after each turn.
How often should I adjust shutter louver tension?
Check tension screws every six months, particularly at seasonal changes. Dry conditions cause wood to contract, which loosens joints and requires more frequent adjustment.
What angle should closed louvers sit at?
Closed louvers should angle approximately 10 degrees downward and away from the room. This position maximises privacy, directs water runoff away from the frame, and is the position the shutter mechanism is designed to hold.
Can I adjust louvers on all types of plantation shutters?
Shutters with operable louvers and a tilt rod allow full angle adjustment. Fixed-louver shutters do not offer this control, which is why operable designs are the preferred choice for rooms where light and privacy management matters.
When should I call a professional instead of adjusting louvers myself?
Call a professional if tension screws are stripped, if the panel frame is warped, or if louvers on custom-shaped windows such as arched or bay frames are misaligned. Shutterworld’s installation team can diagnose and resolve issues that go beyond a standard tension adjustment.